Independent Research #7: Becoming a Blender Master (& Trim Sheet Update!)
- Rachel Molnar
- Oct 27, 2025
- 4 min read

Welcome to post #7 of my independent research journey!
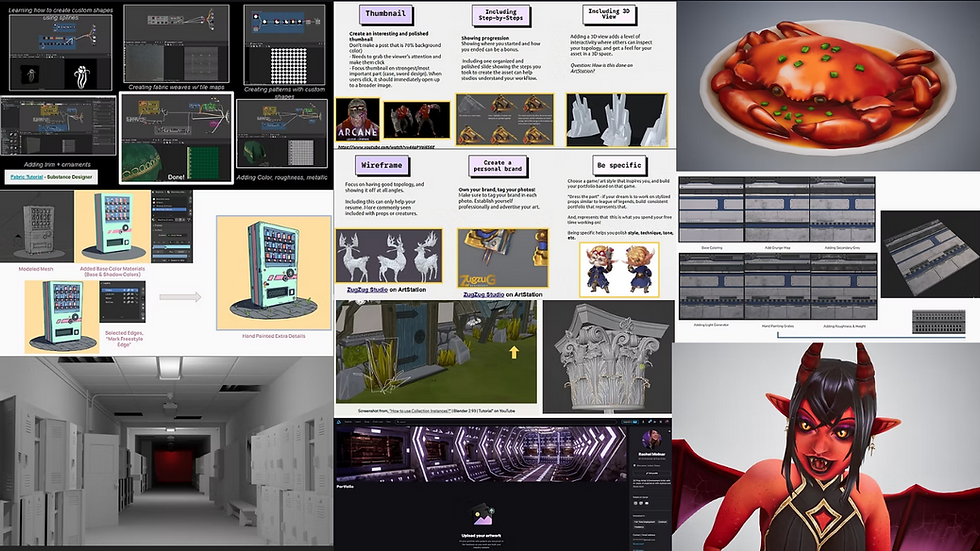
Before we get into some new topics for this week, I would like to give you an update on my trim sheet project and the creation of a Sci-Fi hallway using textures. This week I quickly created a floor texture following the same process as before—modeling unique details in Blender, exporting into Substance Painter, and using the same parameters and color palette that I used for my previous trim sheet by creating a smart material from the project before. I wanted to create something that had a grate/mesh flooring, with a hint of pipes and wires visible below. Here is the floor texture that I created, the white bits being emissive floor lights:

I then created a new material for the module floor and set up the textures properly by referencing Ryan King Art's amazing and helpful tutorial on how to properly set up texture maps in Blender. Here is the now completed, textured sci-fi module!


I am super pleased with how this project turned out! I can't wait to bring the environment to life by adding props and decals to break up the modularity of the scene. Reflecting on everything I've learned about tiled textures and trim sheets, I feel I did a great job creating a texture that is visually interesting without being distracting. This was a really fun project, and I would definitely love to practice making more trim sheets in the future!
Becoming a Blender Master
Now for more updates on my learning this week. In all of my experience with 3D art and game development, I learned all my 3D modeling skills using Blender. Since then, I have gone on to make many different scenes and props and have even become an assistant teacher, teaching introduction to 3D modeling basics. Still, ironically, I would say that half of Blender's capabilities remain a mystery to me...
I realized I have never taken the time to learn Blender through and through—a program that has numerous capabilities from rigging to animating, and even nifty modeling tricks. I believe that taking a step back to learn the program with care will help me become a better 3D artist and create even greater projects in the future. Thus, I decided to research Blender myself and create my own Blender guide that I could reference. My goal was to learn various shift hotkeys, but also understand the different functions of meshes, modifiers, and even snap & select modes. So let's get into it...
I started by creating an organized outline for my research, highlighting my goals and organization. Here is a link directly to my cheat sheet document if you too find it helpful!
I decided to start my learning with the most obvious feature of Blender, the "Add" menu. This is where you can add meshes, curves, and various objects you can use when modeling. Having so much experience with Blender already, this section was one I knew well, but not to its full extent.
Something I learned was the difference between Ico Spheres and UV spheres, something I had always wondered.

I did some deeper diving on this Blender Forum about what people had to say about the differences between the two. I learned that the main advantage of a UV Sphere is achieving smooth, even surfaces because it is quad-based and has denser topology, though sometimes this is not optimal topology for games. I learned that Ico Spheres are better for modeling rough terrains and achieving ideal topology, but should be used for something that will remain uniform in any orientation. One user gave the example of a billiards ball, which will not change shape, versus creating a spaceship by stretching a sphere.
I also learned about the "Path Curve," and how it is ideal for creating smoother curves. I have never used one before but quickly realized how useful something like this could be when creating things like roads or objects with a gradual and smooth deformation. Since the curve begins as a straight line with vertices on each side, it seems easy to line up and create a repeating pattern—something very useful when creating something like long wavy wires.

Also, who knew adding fur was as easy as clicking "Add --> Fur" on a mesh? This was also something new I didn't know was a feature.

Even in an area I thought I knew well, I'm already learning new things I’ve never explored. I can only imagine what I'll find in untouched territory, like sculpting and advanced modifiers. By meticulously analyzing every feature, I'll better understand the program's full potential, and thus, my own creative capability. My new mission is to master all of Blender—from sculpting and modeling to modifiers and Geometry Nodes.
I will be putting all of my findings in my cheat sheet that I linked, so feel free to click the link to view my research progress. The time between now and my next post will be focused mainly on research. I then hope to put my findings to use and model a project using the tips and tricks I learned. By following along, maybe you'll learn something new yourself!
Until next post, I can't wait to share with you all more research findings!


Comments