Independent Research #5: Creating My Own Trim Sheet in Blender (Continued)
- Rachel Molnar
- Oct 22, 2025
- 3 min read

Welcome to week 5 of my independent research!
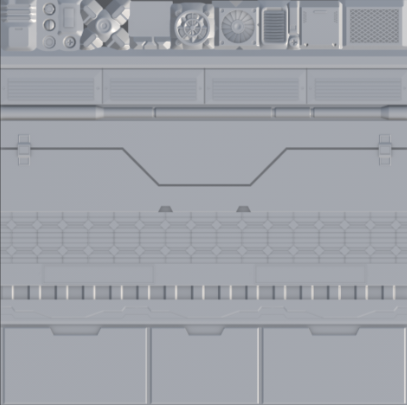
For this progress report, I continued work on modeling my own trim sheet. Last we left off, I had modeled a detailed Sci-Fi themed trim sheet. I was quite satisfied with the design I had composed and felt ready to start the texturing process. Here is the design we left off with:

The texturing process begins with baking, which involves taking the high-poly details I modeled and "projecting" them onto a low-poly plane. This technique creates the illusion of detailed geometry without increasing the topology or file size that the actual modeling would require. Although I thought I was ready to texture, I then ran into some issues...
As you'll notice, the top row of my trim sheet (specifically the decals) was baking oddly. I tried researching solutions but couldn't figure out the cause. I spent hours on troubleshooting: exporting, triangulating my meshes, merging by distance... I even plugged a screenshot into ChatGPT to ask what was happening. I tried every trick I could think of, yet the baking results remained consistently flawed. This proved to be incredibly frustrating and made it impossible to continue with the texturing portion of the project.
In the end, feeling exhausted, confused, and defeated, I chose to set aside the decal portion of the trim sheet for the time being and substitute it with more horizontally modular modeling. This allowed me to continue with the texturing phase. Looking back, the issue may have been that in an attempt to make the decal backgrounds transparent, I removed the underlying plane, which likely confused Substance Painter's depth perception and caused the baking errors. Still, this challenge forced me to reimagine my trim sheet and find ways to improve the overall design.
While brainstorming replacements for the top section, I began rethinking the design as a whole...
Something felt missing—perhaps smaller details like screws or rivets?
I grew dissatisfied with the middle section of the trim sheet (the trapezoid-like line). I questioned its effectiveness when tiled and its overall functionality within the sheet's design, so I decided to scrap it.
The "solar panel" tiled part was a good idea initially, but I realized it wouldn't suit the environment I was imagining or blend well with my other modular rows. I chose to scrap this as well.
What I had anticipated would be a week of texturing turned into a week of reimagining and re-modeling my trim sheet. For inspiration, I turned to resources like ArtStation, YouTube, and games that initially inspired me, such as Split Fiction.


Feeling inspired, I began to experiment with and model changes to my trim sheet. It seemed to me that sometimes less is more; perhaps I just needed to create more simple designs that would blend together more easily, rather than getting too creative and complex. After hours of adding and deleting, here is my completed modeled trim sheet:

I'm honestly very pleased with how this turned out. I can clearly imagine how this sheet will tile and believe it will be much easier to blend seamlessly than the previous version. While it took a considerable amount of mental and modeling effort, I'm glad I reimagined my Trim Sheet, and I'm now excited to texture this final version. This has been my design journey so far:

As you can see, my trim sheet design has changed significantly since my original 2D concept. I'm excited to finally texture this project and begin applying it to an environment, maybe even reincorporating some of the decals I had mentioned in my last post. Next time, I'll be sharing my texturing progress—hopefully without any baking issues!
I can't wait to share my progress with you soon!


Comments