Independent Research #10: Grease Pencils in Blender!
- Rachel Molnar
- Nov 20, 2025
- 3 min read

Welcome to blog post #10 where dive deeper into learning Blender, this week specifically about Grease Pencils!
Only recently had I heard of, or even began to understand, Blender's Grease Pencil feature—a feature that allows you to stylize your geometry with outlines and hand-drawn lines, blending the use of both 3D and 2D art. Having a long background in both traditional and 2D illustration growing up, when I learned that this feature existed, I couldn't wait to get my hands on it.
The idea of creating a 3D environment and making it look 2D really fascinates me. While doing some research, I came across some really cool tutorials and videos that illustrated the use of Grease Pencil, like PolyPaint's animation of this frog sitting on a rock that I mentioned in a previous post:

For this week, I was hoping to create an animation myself using Grease Pencil, but I realized quickly that it was out of my scope given these things do take a lot of time. I had not even learned the basics of Blender's Grease Pencil feature yet! So, one of the videos that I referenced this week to learn that skill was the YouTube video explaining the basics, "Blender Tutorial - Grease Pencil Tool Basics" by Eve Sculpts on YouTube. In this video, I learned everything from how to begin drawing lines from an "empty," how to edit strokes, practicing drawing in a 3D space, how to add stroke stability, and much more!
After having the basics down, I decided that instead of creating an animated scene, it would make more sense to start by just creating a prop. I was really amazed by this tutorial's thumbnail and wondered how they created such a cool, stylized vending machine—it was hard to believe it was 3D! I knew I had to give it a try and watch the process.

This tutorial taught me everything from creating shaders in Blender, to baking lighting, to setting up a camera, and how we can create a simple animation of a rotating vending machine that started as a 3D object and, by using Grease Pencil, created something that looked 2D. The Grease Pencil feature is interesting to me because when creating strokes, each of those lines are actually considered geometry and are curves that we can edit in the Edit Mode of Blender.

This makes me wonder if the use of Grease Pencil can be considered optimal for game development, as one might think this would add to the file size. However, it seems that this feature is mostly used for 2D animation, where file size mostly doesn't matter.
Grease Pencil strokes are also neat because they follow the player's perspective (camera POV). When you leave the camera view and enter the 3D viewport, you can rotate around your object and see that the lines are still facing the camera and look offset.

It's also neat because one might think that the darker colors on the vending machine are just the same color with a shadow cast on it. But from the tutorial, I actually baked the lighting. So, I set the shader settings to display two different colors: one color when in direct sunlight, and one when not in direct sunlight. I manually selected these colors. I found this cool because this process can allow for additional customization, especially when it comes to shadow color and saturation. You could really play around with primary, secondary, or alternate colors to create interesting, stylized pieces.

Ultimately, here's the vending machine I created this week by following along with the tutorial!
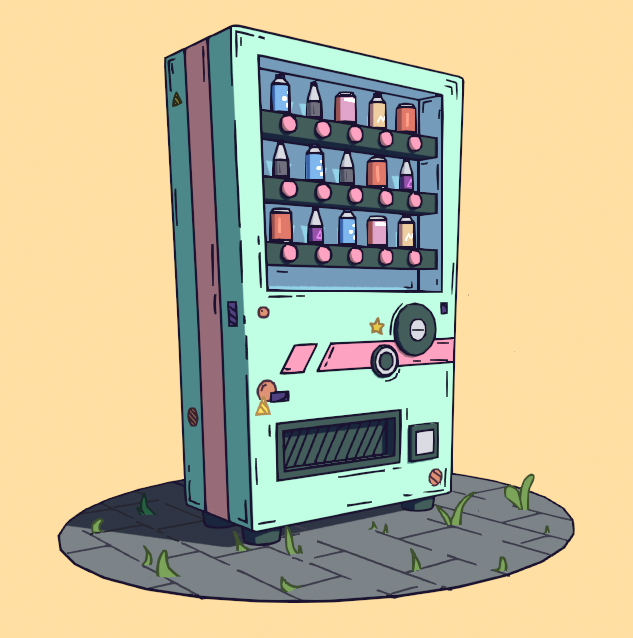
I decided to make a couple of changes to mine and tried changing up the colors a bit. I'm really pleased with how this came out, and it was a lot of fun to make. I learned so much about Grease Pencil, something I had never tried and barely knew anything about before! I can't wait to explore Blender's Grease Pencil feature even more, and hopefully even try creating an animation using it!
This post concludes my personal projects for this current semester at university. In my next post, I want to reflect on all the projects that I have shared thus far, as well as what I have planned for the near future!


Comments