Building My 3D Art Portfolio: Blog Post #9 - Character Project
- Rachel Molnar
- May 3
- 3 min read

Welcome back to my blog post!
Last week, I talked about my process for creating the environment white box for my haunted school hallway project.

While I planned on continuing this project to study and practice vertex painting, I was worried I wouldn't finish it by the end of the school semester. So, I’ve decided to pivot my next few posts to discuss my latest character design project.
For this project, my goal was to sculpt a stylized undead creature using ZBrush. When I thought more about what I wanted to make, I decided that a vampiric lady might be fun to style and paint. I started by gathering references.
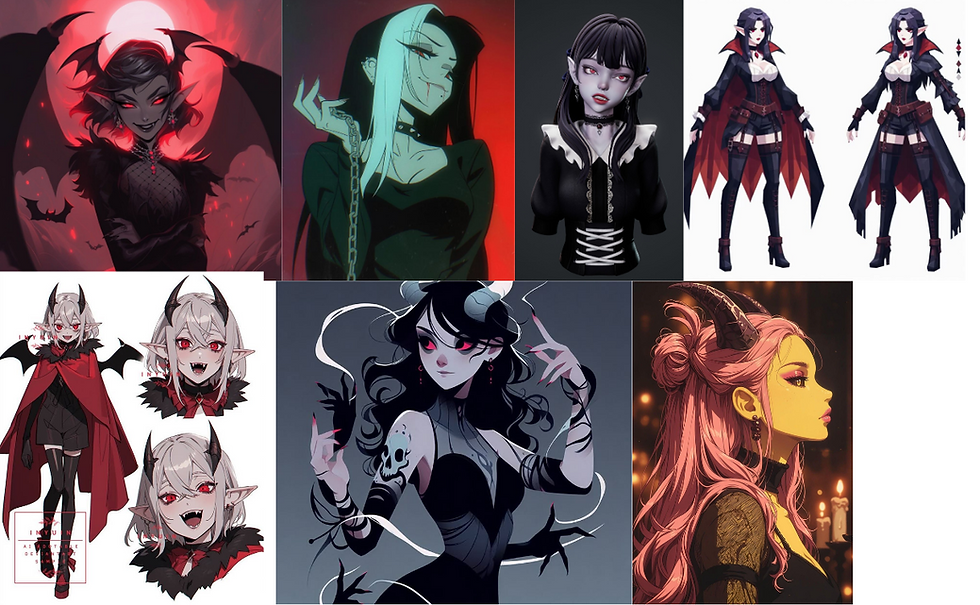
I was particularly fond of the design in the bottom left corner and decided to take heavy inspiration from that character. My first step was to sculpt the face. Since this character is stylized, I wanted to lean towards an anime look with bigger eyes and a smaller nose,

This is my first time sculpting a stylized character, so I tried to emphasize the jawline and leave enough space for hair to sit on the head. After designing the facial features, I moved to Blender to create hair cards (I find it easier to do this there). Starting with a plane, I extruded faces to create the shape of the hair cards, then used a combination of proportional editing and the "grab" sculpt tool in Blender to make micro-adjustments to their position.

This was my first attempt at creating hair cards, my only previous exposure was on characters during my rigging class and from watching a few short texturing videos online. Using what I gathered, I tried creating my own without a tutorial.
As you can see above, I also created nice, thick eyelashes. I struggled at first making these as simple planes, but I found this super helpful tutorial, "See How to Create Expressive Eyelashes with ZModeler" by Emma Collins, which explains her process for making anime-style eyelashes in ZBrush and Blender. I think they turned out much better than my initial attempts, and their thickness really adds volume to the eyes, a key feature in anime aesthetics.
It was around this point that I realized my character looked less like a vampire and more like a devilish creature. I decided to lean into this design and began pivoting toward an "imp girl" character instead, flattening the nose a bit to look more creature-like.
Keeping this redesign in mind, I went ahead and sculpted the rest of the body. I originally learned to sculpt and create bodies using ZSpheres, but I am a big fan of Hart's video, "Creating a Stylized BASE BODY in ZBRUSH!," which explains his sculpting and thought process for stylized characters. I totally recommend watching this video; I learned so much about anatomy, proportions, and shaping. Instead of using ZSpheres, I sculpted each limb separately and then Dynameshed them together, combining and remeshing each separate mesh into one.
After shaping the body, I masked and extruded a skin-tight suit shape as clothing. I figured that for my first character, making the outfit conform to the body would be the simplest practice, allowing me to focus more attention on the remeshing and sculpting process (and eliminating the need for Clo/Marvelous Designer). My favorite brushes for this process were the Move tool and Clay Buildup.

After remeshing my character and bringing it into Blender, I added some simple geometry like jewelry, shackles, and planes for wings so that I could draw the imp wings instead of modeling them. I am sure this method isn't optimal, especially for a character viewed at close distance, but I figured this would be good texturing practice to create convincing depth in the wings.

While the character is currently symmetrical and in an A-pose, I added the tail after the fact to show off an interesting silhouette. When it comes time to rig and pose my character, I will straighten out the tail, as that is better practice for rigging preparation.
In my next post, I will be going over the texturing process for this character. Stay tuned for the results!


Comments