Building My 3D Art Portfolio: Blog Post #6 - Posting My Stylized Crab Model on ArtStation (Soon)
- Rachel Molnar
- Apr 23
- 3 min read

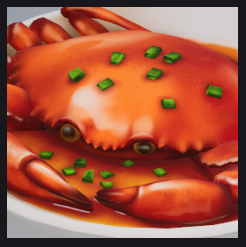
Welcome back to my blog! I’m excited to finally share a project I’ve been working on since the start of the semester: my stylized crab model.
Reflecting on what I learned at the beginning of this journey, I wanted to ensure my first major portfolio post followed the best practices for ArtStation. Here is the action plan I developed to make sure the work stands out:


With these goals lined up, I then broke down each step and developed an action plan for each - who knew so much thought went into an ArtStation Post!
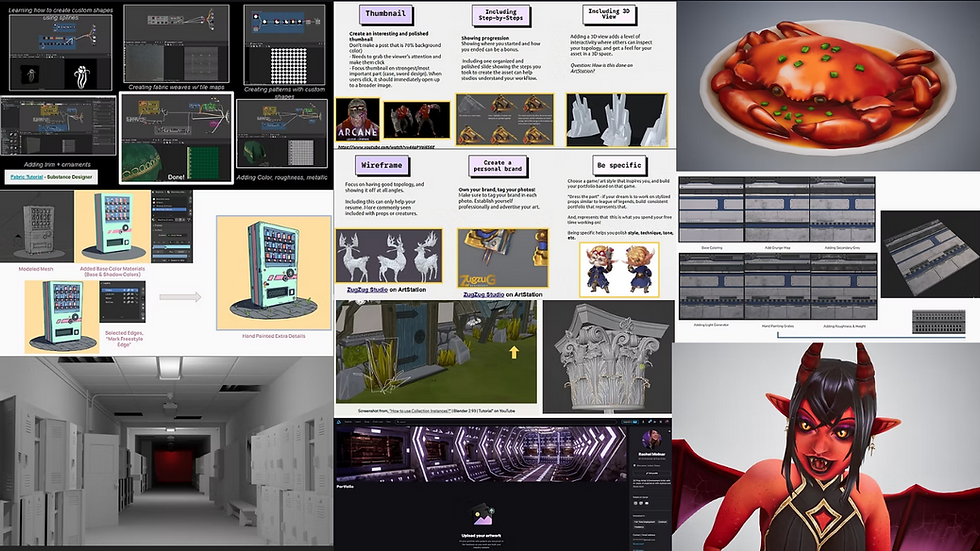
Thumbnail:
The thumbnail is your first (and often only) chance to grab someone’s attention on the discovery page. I focused on a few key elements to make it visually compelling:
Good resolution
1920px in Width
The "Sneak Peek" Effect:
When someone clicks onto the post, it should open up into a larger 3D view, rather than just showing off the thumbnail twice
Composition
No "Blank Space" (Focus should take up 90% of the photo)
To get the perfect shot, I rendered the crab in Unreal Engine 5 to see the results in real-time. Since this was my first time rendering a stylized prop in UE5, I followed this SUPER helpful and up-to-date video on how to do this by RBGore! on YouTube. The example prop was stylized too so that definitely helped me when it came to understanding rendering.
From this video, I also learned that if your textures look unintentionally shiny when importing MOR maps, you often need to disable "sRGB" in the texture settings so the engine doesn't treat it as a color map.
After following this tutorial, I was able to put together a render that used 3 point lighting, rendering at the exact angle I wanted to capture from the reference:


In the past, I have done some research on how to use photoshop to enhance their thumbnails, but since my post is only a prop and does not need exaggerated lighting or boosted effects, I opted to use ArtStation' s default capture this time around.
3D View/Turntable Animation:
While I initially considered using the Marmoset Viewer, I realized that high-quality 3D views are an ArtStation Pro feature. As a workaround for my first post, I decided to create a high-res turntable animation instead.
I had done some previous research on how to do this in Blender, but figured it would be higher resolution if done in Unreal. This video really broke down the steps & optimal settings for creating a turntable in Unreal, from setting up cameras, to creating image sequences, to switching them all together in Adobe Premiere Pro:
Here is a collection of what those image sequence exports looked like for my crab, and combining them in Adobe Premiere Pro

And here's how that turntable animation came out!
Creating A Personal Brand:
After checking out other ArtStation posts from the discover page, I realized a majority of people do not do this. I decided to skip this time around, since it is my first post and I am not part of any studio/do not have any 3D asset branding or marketing yet,
Wireframe:
To showcase the technical side of the model, I included wireframe renders. While the topology isn't at an ultra-low poly count, the density was a conscious choice to support the sharp, stylized edges of the shell. I used a combination of Blender’s wireframe display and Canva to create a clean collage that highlights the flow of the geometry.

Including Step-by-Steps:
After drafting the post and getting feedback from my classmates, I realized that including a "behind-the-scenes" look at my Substance Painter layers would add a lot of value. It’s one thing to see the finished crab, but showing the texturing process proves the effort behind the stylized look. Organizing these layers is my next big task!
Extras:
After considering each of these important aspects in drafting my ArtStation post, I then filled in the extra information including description, credits to the original artist, software I used, and some helpful hashtags like #gameart #props and #stylized

I’ve already filled in the metadata—credits to the original concept artist, software tags (Blender, ZBrush, Substance, and UE5), and hashtags like #gameart and #stylized. All that’s left is to finalize the step-by-step breakdown panel. I’m currently researching the best way to render high-quality progress shots, so stay tuned for my next post where I’ll reveal the finished ArtStation layout!


Comments